| About | Design an email, drop in data tags, and send it once. Everyone on the distribution list will receive a personalized copy, like it was written just for them.1 Launch the Email Wizard. Click the  icon in the top-right, then select eMarketing from the dropdown.From the left-hand navigation, click Emails. If you have multiple campaigns, select one from the dropdown. icon in the top-right, then select eMarketing from the dropdown.From the left-hand navigation, click Emails. If you have multiple campaigns, select one from the dropdown.
Click Create Email to launch the email wizard.2 Select a template or start from scratch.Choose your creation method:
- Copy an existing email lets you copy an email you've already created. Select the campaign, if necessary, and then select the email from the dropdown that appears.
- Copy the content from an account template lets you select an email created at the account level for use in any event. Select the template from the dropdown that appears.
- Create a new blank email lets you write and format all the content from scratch.
Click Next.3 Define the email's settings. Personalize the Subject or From Name fields by clicking the  icon next to each field and inserting data tags. Any replies to this message will go to the From Email Address. Don't see the email you want in the dropdown? Add more by clicking the icon next to each field and inserting data tags. Any replies to this message will go to the From Email Address. Don't see the email you want in the dropdown? Add more by clicking the  icon in the top right, and going to Admin > Data Lists > Account Email Addresses.Select a campaign from the first dropdown. icon in the top right, and going to Admin > Data Lists > Account Email Addresses.Select a campaign from the first dropdown.
If you would like to include recipients' CC email addresses, select the dropdown below "Additional email addresses that will receive this email." Then, check the box next to "CC Email Address." If you've created custom contact fields to collect more CC emails, such as for secretaries or sales reps, they will appear here as well.
Determine whether to use the default format settings you already configured for this campaign or for non-campaign emails. If you choose No, more options appear, letting you set up this email differently.
If you chose to activate a webpage version of this email, enter the text you want to appear as the link in the Webpage Name field. Enter a Data Tag Code to help you find this data tag later and determine whether to make this page public to people searching the internet or private, so only recipients can see it.
| NOTE: The Data Tag Code is what makes the link to the webpage version of the email unique, so you can't have two emails with the same code. |
Click Save and Finish.
4 Design your template. Click Design Email. Your canvas will be blank, aside from your footer. Click Build to the right of the canvas. Drag and drop the different widgets onto your canvas, building out the content of your email.
| NOTE: Some additional formatting, like custom fonts and rounded corners on buttons, may not render in the recipient's email. This is dependent on the settings of their email client. |
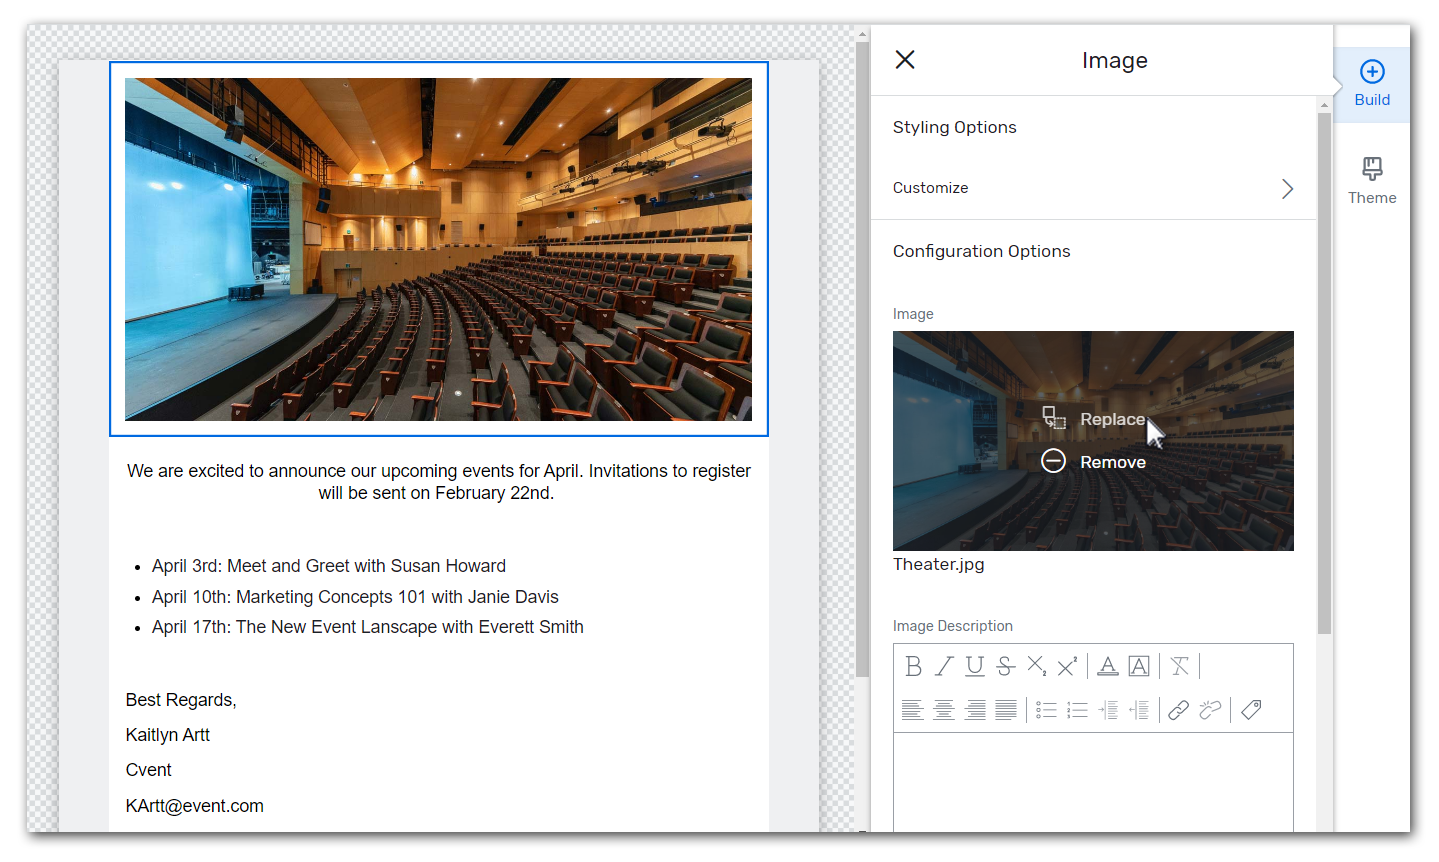
To customize a block of text in the body of the email, click on the text widget. In the Configuration Options to the right of the canvas, change the colors of text, bold, italicize, and underline, adjust alignment, and insert bulleted lists, hyperlinks, and data tags.
To customize its text and design, click Theme. This section will allow you to change the styling of your email without needing to individually customizing each widget you add. You can switch back and forth between the build and theme widgets as often as you need.
| NOTE: Any changes to the theme will affect all email templates. If you want to only update the email you're creating, click Build, select a widget, then click Customize under Styling Options, and make the necessary edits. You'll need to do this for each widget. |
Click Save.5 Establish your email settings. In the top left of the canvas, click the Email dropdown, then click  to the right of your email to open its settings. to the right of your email to open its settings.
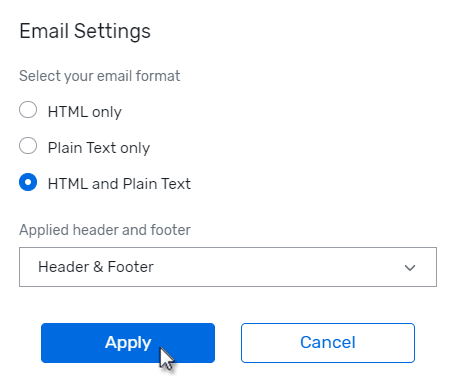
Choose from the following email formats:
- HTML only: Only the HTML version of the email will send. If the recipient's mailbox cannot accept HTML emails, they'll receive an automatically rendered Plain Text version.
- Plain Text only: Only the Plain Text version of the email will send. Colors, graphics, and additional formatting are not supported.
- HTML and Plain Text: The HTML version of the email will send. If the recipient's mailbox cannot accept HTML emails, they'll receive the Plain Text version that you are able to customize. This ensures that no one will receive a blank or incomplete version of your email, as you can control the text and hyperlinks that are used.
Then, determine if you want to use the applied header and footer, or none. Click Apply.
 6 Customize the Plain Text version, if necessary. If you're sending a Plain Text version of the email, use the Format dropdown in the top-right of the canvas to select Plain Text.
Click Text to the right of the canvas, then continue customizing your email content. Make it easier on yourself by clicking Copy text from HTML email to automatically copy the text and hyperlinks that you entered in your HTML email to this Plain Text version.
When you're finished, click Save.
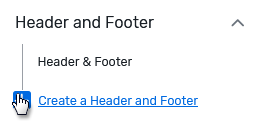
7 Manage your header and footer, if necessary. If you want to use a different header than the default for this email, you can add a new one. In the top left of the canvas, click the Email dropdown, then, in the Header and Footer section, click the  icon to the right of "Header & Footer." Under "Apply this header and footer to the following emails," uncheck the email you are currently working on. Click Apply. icon to the right of "Header & Footer." Under "Apply this header and footer to the following emails," uncheck the email you are currently working on. Click Apply.
Click the  icon to add a new header. icon to add a new header.
If you would like to make this the new default Header and Footer for new emails, switch the toggle to blue. Check the emails that this header and footer will be applied to. Click Create.
On the canvas, customize your header and footer.
When you're finished, click Save.
8 Preview your template. In the top right, click Preview. View your email as an invitee would on a desktop, tablet, or mobile device. Click the X in the top right to return to the canvas and make any necessary changes.
Once you're done, click Save. Close out of the Email Designer.
9 Test your template. To send a test email to yourself or another user, hover over Send Email, and click Test Send to Myself or Test Send to Someone Else. If you select to send the test to someone else, select the type of user from the Type dropdown and click the ellipsis (...) to the right of the Recipient field.
Locate the user when the pop-up appears and click Select to the left of their name. Click Add Recipient to send the test email to more people.
Click Confirm Test Send.
|
|
|---|